
Page 138 - South Mississippi Living - December, 2018
P. 138
LEISURE wrap it up 1)
No Box for that Gift?
No Problem with this Wrapping Paper DIY
story by Kelsey Sunderman-Foster photos by Mary Sunderman Materials
• Scissors
• Scotch tape
• Hole punch
• Ribbon
• Wrapping Paper
I don’t know about you, but gift wrapping is not a strong suit of mine. I struggle every year, especially when it comes to wrapping oddly-shaped things. But fear not! This wrapping paper hack is the perfect way to not only save money on expensive gift bags, but to be able to tackle wrapping gifts of any shape or size. And trust me, if I can do it, so can you.
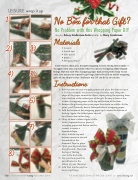
Instructions:
1) Roll out some of your wrapping paper and place the item on top of it. For our example, we chose to wrap a holiday vase. Wrap the edges of the paper around the object, taping along the opening from top to bottom at the widest part of the gift. Be sure to leave a few inches of wrapping paper at the top and bottom of the item.
2) Remove the gift and place your paper face down on a table. At this point, you’ll basically have a flattened tube of wrapping paper.
3) Fold the bottom of the wrapping paper up to create the bottom of
the bag. Again, the folded piece should
be at least a few inches long.
4) Okay, so here’s where it gets a little
tricky. Separate the two piece of wrapping paper and flatten out the corners to create a
diamond shape.
5) Next, fold the top and bottom corners in toward the middle of the diamond. Tape in place.
6) Open your bag and place the gift inside. Then fold the top of the bag
over to the back side.
7) Use your hole punch to punch holes for the ribbon of your choosing.
8) Add final touches such as bows or gift tags.
2) 4)
3)
5)
6)
7)
8)
138 SOUTH MISSISSIPPI Living • December 2018
FOR MORE REFLECTIONS OF THE GULF COAST >> www.smliving.net
